Design, build and use a meta-model in MagicDraw
It took me ages to figure out how to use this feature in MagicDraw (MD), so I thought it the prudent thing to do capture my model and how I created it with the gotchas!!!
- create a normal project
- Create a package that has the <<profile>> stereotype, MD has this as an option on the context menu
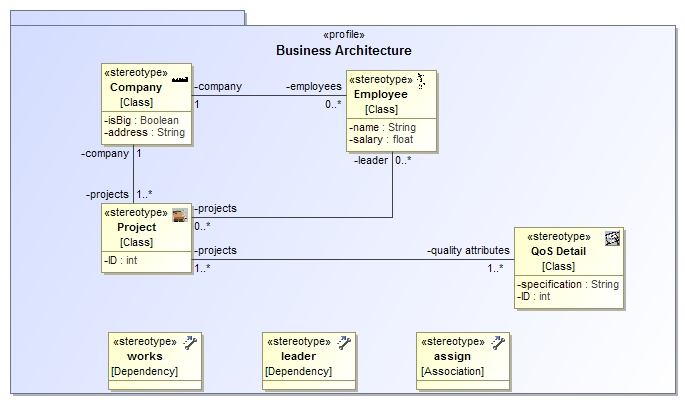
- In the profile package, create a class diagram, populate it with what look like classes but are stereotypes whose metatype is "class", so something like this
- You don't have to put the classes into the package
- Any relationships (associations) that are unique to your model should be modelled as stereotypes, select the appropriate metatype. In the above model, the metatypes "Dependency" and "Association" have been used
- To specify the line style, open the specification of any of the associations, select the Icon field in the main panel, you should get the following dialog
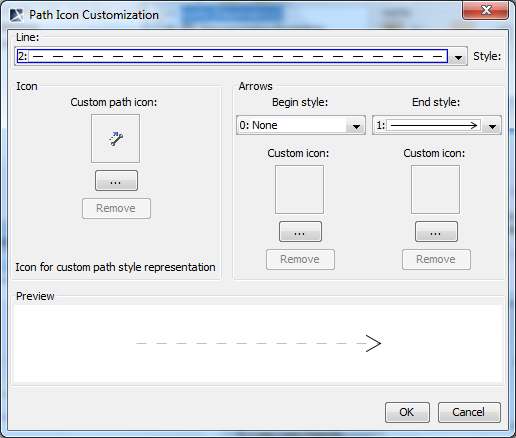
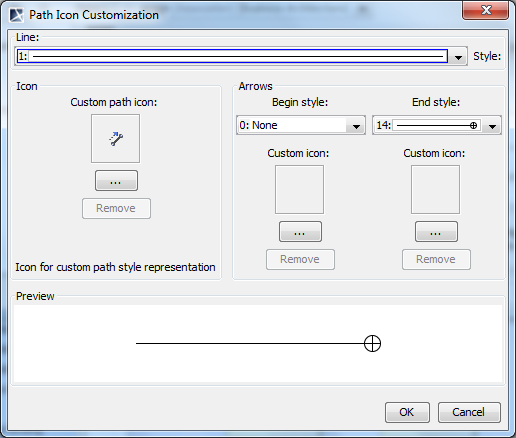
- select the line style, a custom Icon, and line begin and end styles. For example, the assign association settings looks like this
- For each metatype, you can create extra attributes that will be part of any class that the stereotype is assigned to. These attributes are created under the "Tag Definitions" properties as shown here
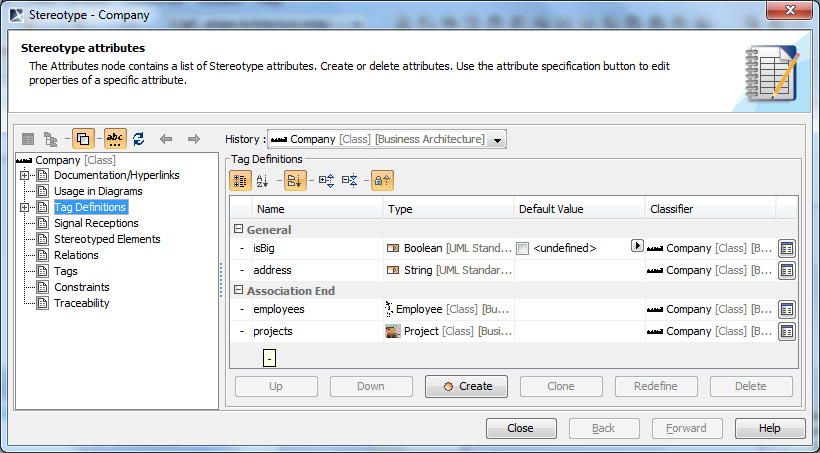
- Select the "Create" button to create new attributes. These attributes appear as tag values in the Elements that the stereotype is assigned to
NOTE: the default behaviour of any type you create is to follow the normal rules that exist between classes. To change this behaviour you have to use Customizations...
Customizing your meta-model
By default your meta-model is just a model of stereotypes. Applying the profile to your model won't do much except maybe add an icon to your model elements, add extra attributes and add constraints. But if you want to control how the meta-model is used, you need to create a Customization. A MD <<customization>> is a set of tags that MDs DSL uses to validate your model in real-time.
Let's begin by creating a customization of the Company stereotype. Using the Specification dialog, select Tag Definitions and create some attributes for the Company. If you apply the Company stereotype to an Element, those attributes you have just created will not be visible in the Element that you have just applied the stereotype to. However, if you create a Customization for the Company stereotype, the attributes will now be visible in the Specification dialog of the Element that the Company stereotype has been applied to.
The MagicDraw document "MagicDraw UML Profiling & DSL User Guide.pdf" outlines the basic steps to creating a customized element. Firstly it recommends that you create two separate projects, one for the stereotypes and the other for the customizations. The former first. The profile package must then be shared and not exported, there is a difference. The latter project containing he customizations should also contain a profile package that must be shared. It is this shared package that must used by the normal UML projects and not the project containing the stereotypes!
The steps are as follows:
Creating a new diagram type (important step)
Your meta-model doesn't actually work too well unless you assign it to a diagram type of its own, this is done through the following steps
- Specify Diagram Type and Icon
- Specify Modules
- Specify Toolbars
- Specify Toolbar Buttons
- Specify Symbol Properties
- Specify Smart Manipulators
This information is summarised below but detailed in the "MagicDraw UML Profiling & DSL USer Guide.pdf"